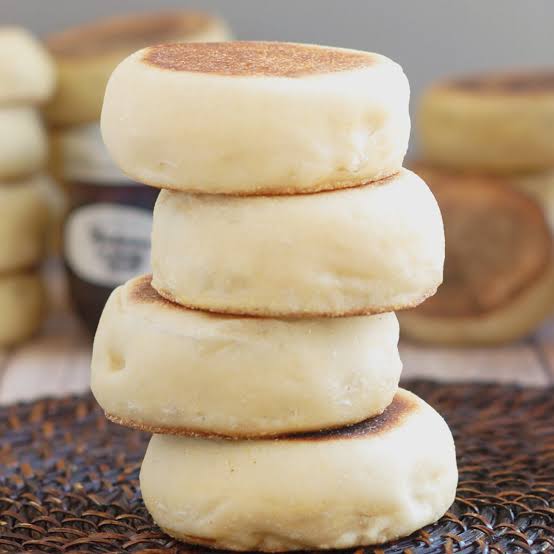
Welcome to the wonderful world of homemade sourdough baking where simple ingredients transform into something truly magical. This comprehensive guide will show you how to make delicious sourdough English muffins right in your own kitchen using your active sourdough starter or leftover discard. If you have ever wanted to master a bakery style breakfast treat without buying processed store versions filled with mysterious additives, this recipe is your ultimate answer. You do not need any fancy professional equipment or years of baking experience to succeed here because every single step is broken down into friendly and easy to understand instructions. Baking bread and breakfast items from scratch brings a deep sense of calm and accomplishment into a busy modern life, allowing you to slow down and enjoy the therapeutic process of mixing, kneading, and watching dough rise. By the time you finish reading this article, you will feel completely confident in your ability to whip up a batch of warm, golden, and bubbly English muffins that will make your entire house smell like a cozy artisan bakery on a lazy Sunday morning.
People absolute fall in love with homemade sourdough English muffins because they offer a wonderful contrast of textures and flavors that store bought versions simply cannot match. When you bite into a fresh English muffin made with real sourdough, you get a satisfying exterior crunch followed by a soft, fluffy, and pillowy interior that melts gently on your tongue. The natural fermentation process gives the bread a subtle, pleasing tang that dances on your taste buds, elevating simple butter and jam to a whole new culinary level. Furthermore, these muffins are famous for their legendary nooks and crannies, those wonderful little holes and pockets created by gentle gas bubbles during fermentation that catch pools of melted butter, golden honey, or rich fruit preserves like sweet nectar in a cup. Once you experience the incredible satisfaction of pulling apart a freshly toasted muffin with a fork to reveal that signature rough interior texture, you will never want to go back to the flat and rubbery plastic wrapped packages from the grocery store aisle.
Making these wonderful breakfast treats is a wonderful idea whenever you want to treat yourself and your family to a wholesome morning feast that feels extra special and full of love. You might choose to bake a batch on a quiet weekend when you have extra time to relax in the kitchen, or perhaps you want to use up some bubbly active starter or discard sitting comfortably inside your refrigerator jar. From a taste perspective, nothing beats the fresh aroma of yeast and flour mingling together, and from a wellness standpoint, sourdough fermentation breaks down complex starches and gluten proteins, making the bread much easier on your stomach than standard commercial yeast breads. Whether you are baking to impress visiting guests, packing a hearty breakfast sandwich for a busy workday, or simply indulging in a mindful kitchen ritual to soothe your soul after a long week, crafting these muffins provides a deeply rewarding emotional connection to traditional baking arts.
Let us dive right into the heart of this recipe by gathering everything you need to create your very own batch of homemade sourdough English muffins from scratch.
Ingredients You Will Need
To make these delightful sourdough English muffins, you will need a few basic kitchen staples that you probably already have sitting inside your pantry and refrigerator right now.
-
Active Sourdough Starter or Sourdough Discard: 1 cup (feed it a few hours before starting if you want a faster rise, or use unfed discard if you prefer a more subtle tang).
-
Warm Water: Three quarters of a cup (make sure it feels comfortably warm to your wrist, like a warm bath, not hot).
-
All Purpose Flour: 3 cups plus an extra half cup for dusting and kneading your dough.
-
Sugar or Honey: 1 tablespoon (this feeds the wild yeast and adds just a tiny touch of background sweetness to balance the sour notes).
-
Melted Butter or Neutral Vegetable Oil: 2 tablespoons (adds wonderful richness and tenderness to the crumb).
-
Salt: 1 teaspoon (enhances all the delicious natural flavors of the flour and fermentation).
-
Cornmeal: Half a cup (crucial for dusting the baking surface and giving your muffins that classic, crunchy bakery bottom).
Step By Step Method
Now that you have all your ingredients measured and ready to go, it is time to start the fun part of the baking process. Follow these detailed steps closely, and you will achieve golden, bakery quality English muffins on your very first try.
Step 1: Mixing the Dough
Start by taking a large mixing bowl and combining your warm water, sourdough starter or discard, and sugar or honey together. Stir everything gently with a wooden spoon or a silicone spatula until the starter is mostly dissolved into the liquid and the mixture looks milky. Next, pour in your melted butter and add your all purpose flour and salt directly into the bowl. Stir the mixture continuously until a sticky, shaggy dough begins to form and no dry flour patches remain visible at the bottom of your bowl.
Step 2: Kneading for Texture
Turn your sticky dough out onto a clean kitchen counter or wooden cutting board that has been lightly dusted with a little bit of flour. Use the heels of your hands to push the dough away from you, fold it back over itself, and give it a slight turn, repeating this rhythmic kneading motion for about eight to ten minutes. As you knead, you will notice the dough transforming from sticky and rough into a smooth, elastic ball that feels springy and alive under your fingertips.
Step 3: The First Bulk Rise
Take a clean bowl, coat the inside lightly with a few drops of oil or butter, and place your kneaded dough ball inside, turning it over once so the top is lightly greased. Cover the bowl tightly with a clean kitchen towel or plastic wrap to lock in moisture and keep drafts away. Let the dough rest and rise in a warm spot in your kitchen for about four to six hours, or until it has noticeably puffed up and increased in size. If you are using unfed discard, this rise might take a bit longer, so feel free to let it rest overnight on your kitchen counter if you prefer.
Step 4: Rolling and Shaping
Once your dough has finished its first rise, gently deflate it with your hands and transfer it back to your lightly floured workspace. Roll the dough out evenly with a rolling pin until it reaches a thickness of about three quarters of an inch, which ensures your finished muffins will be nice and thick rather than flat. Take a round biscuit cutter, a clean glass cup dipped in flour, or a sharp knife to cut out neat circles from the rolled dough sheet. Gather any leftover dough scraps, gently press them back together, roll them out again, and cut out additional circles until you have used up all the dough.
Step 5: The Cornmeal Rest
Generously sprinkle a thick layer of cornmeal across a large baking sheet or a clean wooden cutting board. Carefully transfer each cut dough circle onto the cornmeal bed, making sure to dust the tops and bottoms of the muffins with extra cornmeal as well. Cover them loosely with a kitchen towel and let them rest for another thirty to forty-five minutes so they can puff up slightly before cooking.
Step 6: Griddle Cooking
Heat a large cast iron skillet, heavy bottomed frying pan, or electric griddle over medium low heat. It is very important to keep your heat source relatively low so that the thick muffins have plenty of time to cook all the way through to the center without burning their crunchy cornmeal crusts on the outside. Lightly grease your pan with a tiny touch of butter or oil, then place your rested muffin rounds onto the warm surface, leaving a little bit of space between each one. Cook them slowly for about seven to ten minutes on the first side until the bottoms turn a deep golden brown and develop a wonderful crust. Carefully flip each muffin over using a spatula and cook for another seven to ten minutes on the second side until both outer surfaces are beautifully browned and the internal temperature feels fully set.
Step 7: Cooling and Splitting
Transfer your freshly cooked English muffins from the hot skillet to a wire cooling rack and let them cool down completely for at least twenty minutes before trying to slice them. While it is tempting to eat them right away while they are piping hot, letting them cool allows the interior crumb structure to finish setting properly. When you are ready to enjoy one, grab a fork and gently poke holes all the way around the circumference of the muffin in a circle, then pull it apart gently with your hands to reveal those gorgeous interior nooks and crannies. Toast your muffin halves until golden, slather them with real butter and fruit jam, and enjoy the fruits of your labor.
Why This Recipe Is Special
This homemade sourdough English muffin recipe stands head and shoulders above anything you can buy in a grocery store because it delivers unmatched flavor, wonderful health perks, and a deeply satisfying culinary experience.
From a health perspective, using sourdough fermentation offers fantastic benefits for your digestive system. The wild yeasts and beneficial bacteria naturally present in your starter work hard to break down complex carbohydrates and gluten proteins long before the dough ever hits the hot pan. This natural pre digestion process makes sourdough baked goods much gentler on your stomach, reducing the heavy or bloated feeling that some people experience after eating commercial white bread products.
Furthermore, you are in total control of every single component that goes into your food. There are no artificial preservatives, chemical dough conditioners, hidden corn syrups, or unpronounceable chemical additives in these homemade muffins. You get pure unbleached flour, water, salt, and natural wild fermentation.
When it comes to taste, the difference is truly night and day. Store bought English muffins often taste dry, flat, and heavily reliant on commercial yeast flavorings. In contrast, your homemade sourdough creation features a complex, nutty, and mildly tangy flavor profile that complements both sweet toppings like honey, peanut butter, and strawberry jam, as well as savory breakfast pairings like fried eggs, crispy bacon, melting cheddar cheese, and fresh avocado slices. Every bite tells a story of patience, tradition, and real food made with genuine care.
Extra Tips for Better Taste
To help you achieve absolute perfection with your homemade sourdough English muffins, here is a collection of creative and practical tips gathered from experienced artisan bakers.
-
Control Your Heat Source: The single most common mistake people make is cooking the muffins on a heat level that is way too high. Keep your skillet on medium low or low heat so the thick dough cooks thoroughly in the middle before the outside cornmeal crust gets too dark.
-
Use a Fork for Splitting: Never use a knife to slice your English muffins in half if you want to experience the magic of nooks and crannies. Using a fork to puncture the perimeter and pull the muffin apart creates that rugged, textured surface that catches and holds melted butter infinitely better than a smooth knife cut.
-
Experiment with Flour Blends: While all purpose flour works wonderfully and gives a classic light texture, you can easily substitute up to one quarter of the flour with whole wheat flour or spelt flour to add a nutty, rustic depth of flavor and extra fiber.
-
Freeze for Later: This recipe yields a generous batch, and these muffins freeze exceptionally well. Let them cool completely, slice them in half with a fork, place them in a freezer safe bag, and pop them straight from the freezer into your toaster whenever you need a quick and wholesome breakfast on a busy morning.
-
Flavor Boosters: If you want to get creative with your dough, feel free to fold in a handful of sharp cheddar cheese shreds, fresh rosemary herbs, or even some garlic powder right before the kneading phase to create a savory snack version.
Final Thoughts
Baking your own sourdough English muffins from scratch is an incredibly rewarding journey that connects you deeply to the time honored traditions of home cooking and slow food. There is something profoundly comforting about standing in your kitchen on a quiet morning, watching golden rounds sizzle on a warm skillet, and knowing that you created this wholesome food entirely with your own hands. Do not worry if your very first batch looks a little rustic or imperfect because every single attempt will teach you more about how wild dough behaves, and the delicious taste will make every moment of effort completely worthwhile. Gather your ingredients, take your time with each step, and enjoy the wonderful warmth and joy that homemade baking brings to your daily life.
Nutrition Details
To help you keep track of your daily dietary goals, here is a detailed breakdown of the estimated nutritional values per single serving of homemade sourdough English muffin. Please remember that these numbers can vary slightly depending on the exact brand of flour you use and the precise size of your cutter.
Disclaimer
Please keep in mind that the nutritional information provided in this article is only an estimated approximation calculated through standard ingredient databases and general portion guidelines. Every single person has a unique metabolism, specific health needs, and individual dietary requirements, which means your personal body responses and actual daily nutritional needs may vary significantly. If you have specific medical conditions, food allergies, gluten sensitivities, or strict dietary restrictions, it is always wise to consult with a qualified healthcare professional or a registered dietitian before making major changes to your regular meal plans or trying new homemade bread recipes. Enjoy your baking adventures safely, listen to your body, and always prioritize what feels best for your personal health and well-being.